WordPress is one of the most popular and widely used Content Management System, which is based on PHP and MySQL. The CMS allows complete customization of a blog by means of plugins, widgets, templates etc.
WordPress is a quite secure platform, but a few mistakes or vulnerabilities might risk your blog and its entire user content. A hacker may take advantage of these vulnerabilities and can erase your entire work from the internet. Therefore it is extremely important to secure your installation. In this post we will see some important tips which allows any user to harden his WordPress blog security.
Pre-Installation Security Tips
Download and Install WordPress from Legitimate Source
Being a very popular CMS, WordPress is available for download on many websites throughout the internet. But due to security reasons, it’s always recommended that you should download the latest and stable version of the CMS from its official download page only:

If you are looking for an older version of WordPress, then you can also download it from the official release archive page. Most of these versions are available for download in .zip, .tar.gz and IIS Zip formats.
The CMS can also be installed using auto-installers like Fantastico, Softaculous, Quick Install etc., that may come with your hosting package. It’s recommended that you should always use a trusted auto-installers for installing the CMS.
Change your Username from ADMIN to something else!
If you are going to install WordPress manually or using an auto-installer, then make sure to select a unique username for your administrator account. In case the username of your installation is already set to ADMIN or admin, then you should seriously consider changing it, as you are highly vulnerable to hacking attempts.
Following are the two ways by which you can delete or modify an account which is having its username as ADMIN or admin:
1. Create a new administrator account for your installation. Now, permanently delete the old/default account which is having its username as ADMIN or admin.
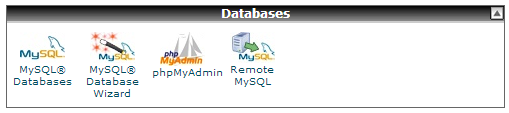
2. Using phpMyAdmin, you can also modify your username to something else. Just login to your hosting control panel (cPanel) and look for phpMyAdmin under Databases:
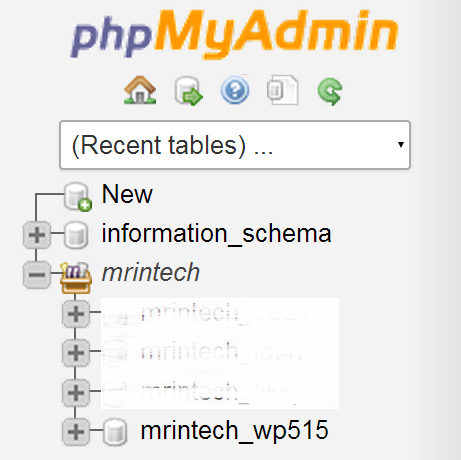
On the left hand side of phpMyAdmin console, click on your database name:
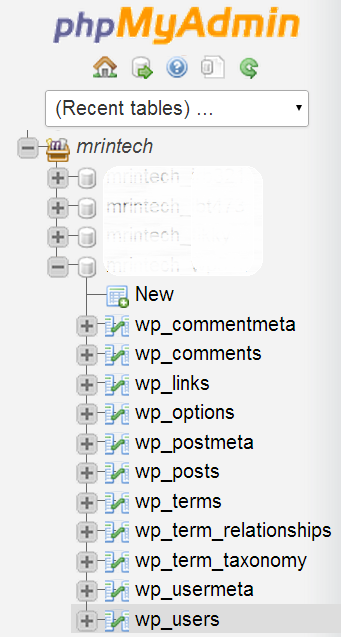
On the next page, select wp_users from the left sidebar:
Now click on Edit in front of username whose user_login value is set to admin and simply enter something else in the value field:
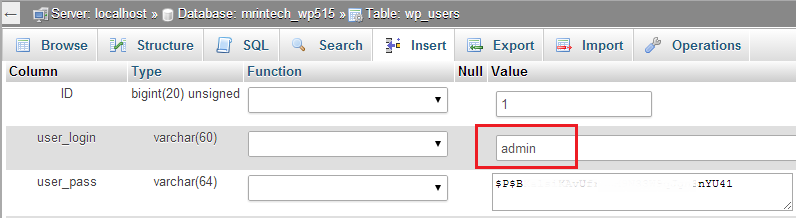
This will change your administrator username to anything of your choice!
Choose a Strong Password
Choosing a strong password is a very important aspect of security. You should always opt for a strong password when it comes to your site’s admin account, FTP (File Transfer Protocol) account and hosting control panel (cPanel, Plesk etc.). You can check the strength of your current password here.
When choosing a password for any of your account, always avoid using following:
- Dictionary words in any language.
- Words spelled backwards, common misspellings and abbreviations.
- Sequences or repeated characters. Examples: 0123456789, 5555555, pqrstuv or any other adjacent letters on your QWERTY keyboard.
- Personal Information like your name, date of birth, city of birth, passport or social security number, bank account number, phone number etc.
A Brute force attack may easily crack your password, if you are using any of the above mentioned information in it.
Certain auto-installers like Quick Install don’t allow you to set a password during the initial installation process. Instead they automatically generate a password and mail it to you. If that’s the case, then you can always change your password from your dashboard:
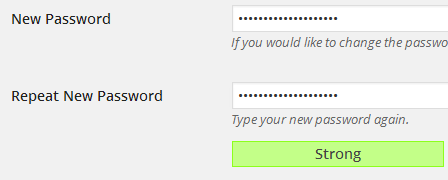
Just go to your Profile Settings Page and change your password from there. The inbuilt password strength indicator will show you How strong your typed password is?
Tip: You can make your password more strong by using a combination of lower and upper case letters, symbols (@#$%^) and spaces.
Post-Installation Security Tips
Update the CMS Regularly
Security issues in WordPress are regularly monitored and a new version is released for everyone as soon as the issues are fixed. You can either download the new version from http://wordpress.org/download/ OR the CMS will automatically apply the update in the background.
Important Notes:
- If you are going to update the CMS manually, then make sure you backup your database first.
- It’s recommended not to use any auto-installer for updating WordPress, as they don’t maintain updates regularly. Sometimes they may also crash your whole installation.
Install Plugins and Themes from Trusted Sources & Keep them Up to date
Plugins and themes may add additional functionalities and features to your installation. It is highly recommended that you should only install those which are:
- Regularly updated by the developer.
- Developed by a trusted and active developer.
- Compatible with the latest version of WordPress.
Never ever install a theme or a plugin which you have downloaded from a torrent or warez site, as they may be either Base64 encrypted or may contain some type of malware which may compromise your whole installation.
Once you have installed a plugin or a theme, it’s very necessary to UPDATE them regularly. Plugin updates can be installed by directly going to plugins page in your dashboard. The page will show you a list of all the plugins whose latest version is currently available for installation:

Theme updates can also be installed from within your dashboard, provided that you have downloaded and installed the theme from WordPress themes directory.
In case you are using a theme or a plugin which is developed and maintained by some third-party developer, then you need to download the update from their site and install it manually.
Use SFTP instead of plain FTP
Once you have successfully installed WordPress in your hosting account, you may need to upload certain files or directories to it in future. You can use a FTP client for doing this, but uploading anything over a plain FTP connection is considered highly insecure.
If your hosting provider has installed a dedicated or a shared SSL certificate on your server, then you can make use of SFTP for uploading as well as downloading files over an encrypted connection.
WinSCP, a free SFTP client for Windows, allows you to connect to your server using a secure connection. All you need to do is to enter your host name (server name or IP address), port number, username and password:
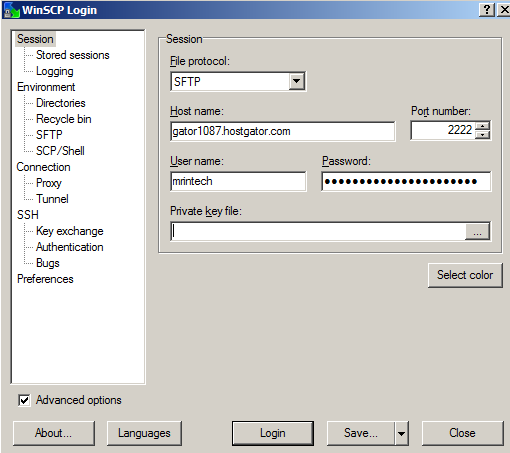
Generally, 2222 is the secure port number used for SFTP connections.
Lock Down wp-includes Folder
wp-includes is a core folder of WordPress, which includes everything needed to run the CMS. The content of this folder must not be accessed or modified by any user. In order to prevent access to this folder, you can make use of following mod_rewrite rules in your .htaccess file:
# Block the include-only files.
RewriteEngine On
RewriteBase /
RewriteRule ^wp-admin/includes/ – [F,L]
RewriteRule !^wp-includes/ – [S=3]
RewriteRule ^wp-includes/[^/]+\.php$ – [F,L]
RewriteRule ^wp-includes/js/tinymce/langs/.+\.php – [F,L]
RewriteRule ^wp-includes/theme-compat/ – [F,L]
# BEGIN WordPress
The above lines must be placed outside the # BEGIN WordPress and # END WordPress tags, as because the CMS can overwrite ANYTHING placed in between them.
Note: The above lines of rules will not work well with WordPress MU, as because RewriteRule ^wp-includes/[^/]+\.php$ – [F,L] would prevent the ms-files.php file from generating images. If you are using WordPress Multi-user, then you should omit this line.
Securing wp-config.php
wp-config.php file contains all the important configuration settings of your installation. The content of this file must not be accessed or edited by any user, unless he exactly knows what he’s doing? In order to deny access to this file, put following lines of code in your .htaccess file:
<files wp-config.php>
order allow,deny
deny from all
</files>
Disable File Editing for Themes and Plugins
By default, WordPress allows administrators to edit their theme’s and plugin’s files without any restriction. But if a hacker manages to break into an admin account, then he can very easily insert malicious code in your installation using the inbuilt editor:
If you want to prevent such a thing, then you can very easily disable the inbuilt editor by inserting following line of code in your wp-config.php file:
define(‘DISALLOW_FILE_EDIT’, true);
After this if you want to edit any of your theme’s or plugin’s file, then you can do so either directly from the File Manager of your hosting account OR using some FTP/SFTP client.
Useful List of Security Plugins
There are certain plugins which can harden your blog security at its best. Some of these plugins constantly monitors your installation and alerts you whenever they find something is fishy, while others take action immediately.
Acunetix WP Security (formerly known as WP Security Scan)
As soon as you install the plugin, it will scan your whole installation and alerts you with following results:
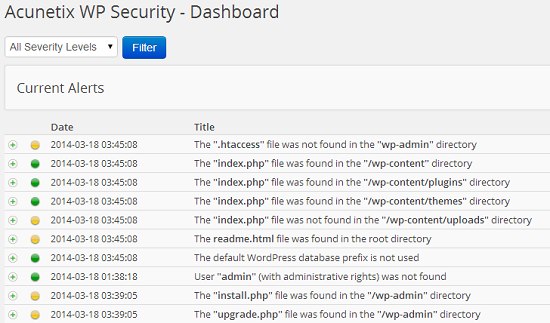
- Whether .htaccess file is present in wp-admin directory.
- Whether index.php file is present in /wp-content, /wp-content/plugins, /wp-content/themes and /wp-content/uploads directory.
- Whether there is a readme.html file in the root directory of your installation.
- Whether default WordPress database prefix (wp_) is used. Many experts consider this a security vulnerability.
- Whether there is a user with username admin.
- Whether install.php and upgrade.php files are present in /wp-admin directory.
- Whether you have the latest version of the CMS installed.
- Whether clearing the content of the readme.html file from the root directory is disabled.
- Whether WordPress version is displayed in links for all users.
- Whether admin, core, plugin and theme update notifications are displayed to all users.
- Whether directory listing check is disabled.
- Whether checks for PHP and database error reporting is disabled.
- Whether Meta, Really Simple Discovery (RSD) and Windows Live writer tags are displayed on front end to all users.
- Whether login errors are displayed.
- Whether exact WordPress version number is displayed to all users. If it’s displayed then a hacker can easily break into your account by using the vulnerabilities present in the currently installed version.
The database page of the plugin allows you to change the database prefix of your installation as well as allows you to backup your current database:
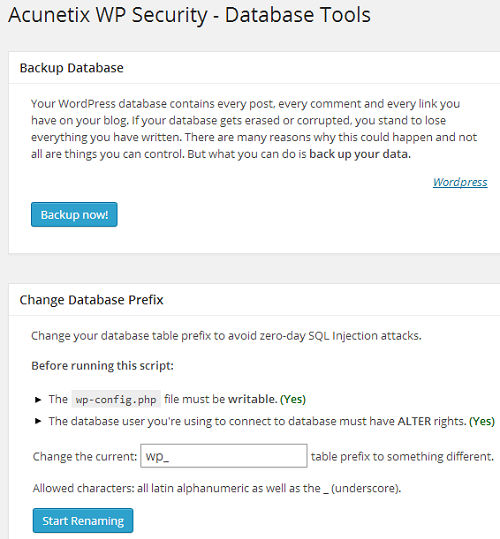
Before running the script, make sure:
- You take a full backup of your database and download it onto your computer’s hard drive.
- The permission for wp-config.php file must be set to writable.
- The user who’s running the script should have ALTER rights in the database, else the script execution will fail.
The info page of the plugin allows you to see following information:
- Name of operating system that your server is currently running.
- Type of server like Apache, LiteSpeed etc.
- Memory usage.
- PHP version.
- MySQL version.
- SQL mode.
- PHP safe mode.
- PHP allow URL fopen.
- PHP memory limit: This option sets the maximum amount of memory in bytes that a script is allowed to consume on your server. By enabling a realistic memory limit you can protect your server as well as installed applications from certain type of DDoS attacks and bugs like infinite loops and other memory intensive mistakes.
- PHP max upload size: This is the maximum size of a file that you can upload to your account. The limit is quite useful when an attacker tries to send huge files to your server, so that your resources can be exhausted. By setting a realistic value for upload_max_filesize you can mitigate damages.
- PHP max POST size: Maximum size of any POST request that PHP will process. Any value above the limit will be rejected by the server.
- PHP max script execute time: A script is allowed to run for a limited time in seconds, before it gets terminated by the server.
- PHP Exif support: Allows you to work with meta data of images.
- PHP IPTC support.
- PHP XML support.
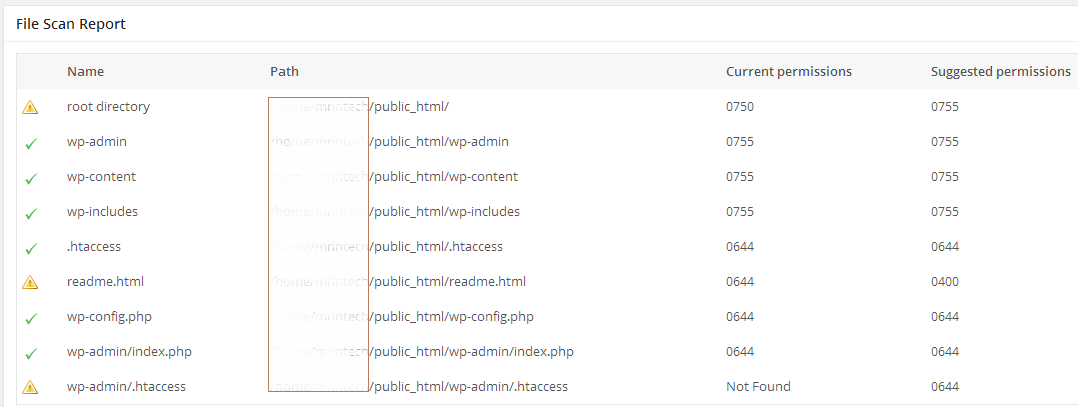
The page will also show you the current as well as suggested permission for all your installation’s core files and folders. If there’s an exclamation mark in front of a file or folder name, then maybe you are required to apply a more restrictive permission (CHMOD) to it.
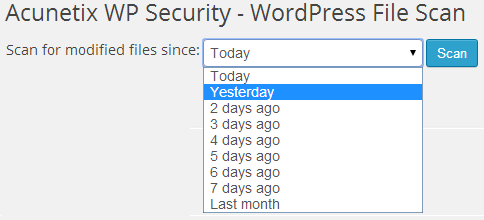
The file scan page of the plugin will try to identify the version of WordPress currently installed and running in your hosting account. It will then check all the files against the official released version of the CMS to see if there’s any modification in the selected time interval:
Note:
1. Just after running the script, you need to change the permission (CHMOD) of wp-config.php to 0644 or something more restrictive. It’s a security risk to have your files writable with 0777 permission.
2. I have personally used this plugin many times to rename table prefixes and the process takes place without any error. But if you start seeing database errors for your site, then you should restore your database using the backup file you created earlier. For restoring the database, either you can use phpMyAdmin or provide the backup file to your host.
AskApache Password Protect
Almost all security plugins for WordPress operate at an application level by using PHP for mitigating attacks, but AAPP protects your installation by working at the network level, without using or controlling PHP. It is designed to stop automated attacks primarily targeted to exploit vulnerabilities of your installation.
The plugin uses inbuilt Apache server’s security module and .htaccess for mitigating attacks. Using it you can also set up password protection for your blog using HTTP Basic Authentication OR you can choose to use more secure version of authentication i.e. HTTP Digest Authentication!
As soon as you install the plugin, it will modify the .htaccess file present in the root directory of your domain and inside /wp-admin/ folder. It don’t modify any other file or database or re-write rules of your installation.
After installing the plugin if you lock yourself out of your own site, then you are required to remove AskApache’s section from your .htaccess file. Simply deleting the plugin will not fix any error.
Login LockDown
The plugin is capable of limiting total number of login attempts from a given IP address OR range within a certain period of time. It can record all IP addresses responsible for FAILED login attempts along with their respective timestamp.
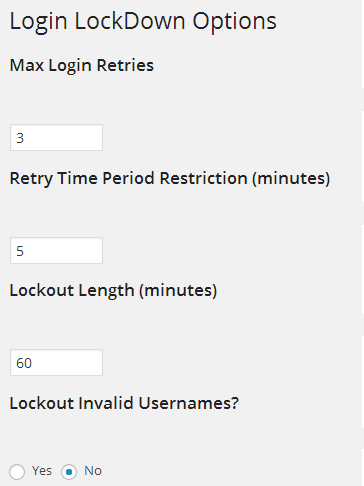
If more than certain number of attempts are detected within a short period of time from a same IP address or range, then the plugin is also capable of disabling the login function for all further requests from that range! If you want to avoid Brute Force attacks meant for password discovery, then this plugin is a must have for you.
WP-DBManager
WP-DBManager is an all in one plugin for all your database optimization related needs. The plugin is capable of optimizing tables, repairing corrupt database or its tables, backing up and restoring database and deleting previously backed up database(s).
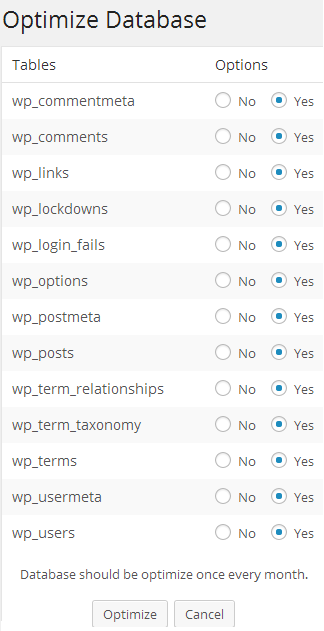
The plugin is also capable of automatic scheduling of backups and compressing the database in Gzip format. If you want to empty or drop certain tables from your database, then you can easily do so with the help of this plugin:
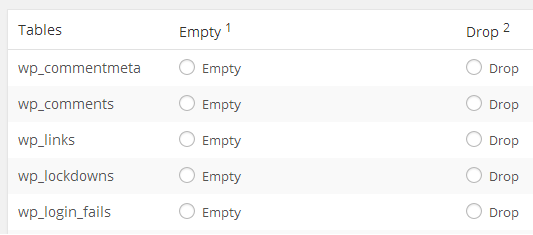
Important Notes:
- EMPTYING a table means all the rows in that table will be deleted permanently.
- DROPPING means deleting a whole table (and everything in it) permanently.
- The above two actions are IRREVERSIBLE, unless you have a recent backup of your whole database.
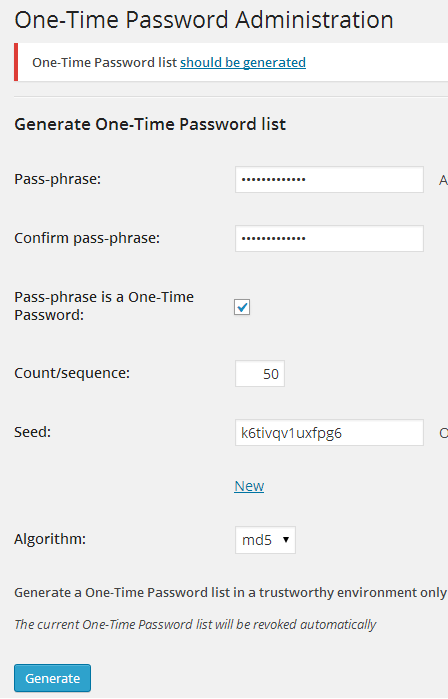
One-Time Password
The plugin complies with RFC 2289 to protect your blog by using login passwords which are valid for one session only. There’s NO need to use your main WordPress password when you are trying to access your website from an Internet cafe, Open Wi-Fi networks etc.
As soon as you install the plugin, it will ask you to generate a One-Time Password list. For generating the list, you are required to enter a Pass Phrase, Total Number of Counts/Sequence and Seed. You are also required to select your algorithm from md4, md5 and sha1:
Once you have entered all the above mentioned details, click on the Generate button and you will get your list:
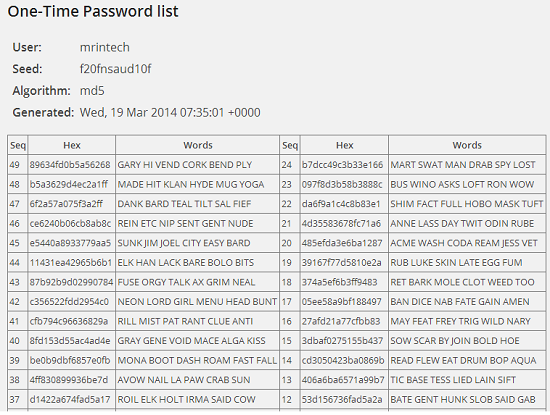
You need to make use of this list for logging in to your dashboard by completing a challenge:

Bad Behavior for WordPress
Bad Behavior is a very powerful plugin that acts as a gatekeeper for your blog. The plugin is capable of blocking SPAMMERS and bad bots based on their IP Addresses. It has got its own unique way of analysing the delivery method and the software used by various type of spammers.
Note: The plugin sometimes blocks legitimate visitors also. ISPs in many countries allots dynamic IP addresses to its users and many users gets blocked by bad behavior based on their IP address’s SPAM activity in the past.
Exploit Scanner
The plugin scans for malware in your whole installation (including themes and plugins directories) as well as database tables (post, comments etc.).
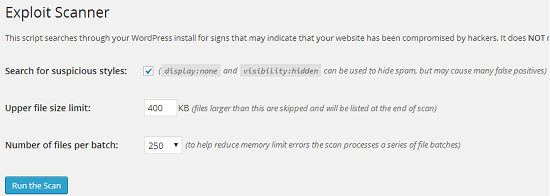
It also allows you to set upper file size limit (files larger than defined limit gets skipped during the scanning process and will be listed at the end of scan) as well as total number of files to be scanned per batch (to help reduce memory errors).
Note: This plugin is a robust scanner, but may consume good amount of memory of your server. Initially the plugin tries to allocate 128 MB of memory for itself, but sometimes it’s not sufficient to complete the whole scanning process. If you encounter memory limit errors, then you need to increase the amount of PHP memory OR contact your host.
BBQ: Block Bad Queries
BBQ is a plug-an-play functionality based plugin which protects your installation from malicious URL requests like eval(, base64_ (Eval base64_decode) and excessively long request strings by monitoring all incoming traffic. It’s based on 5G and 6G blacklists and works silently in the background.
Keep in mind that this is a code based plugin only and you won’t find an options page for it in your dashboard.
CloudFlare
CloudFlare make use of SPAM database from Project Honey Pot, which is a distributed SPAM harvester tracking network, to make your blog safer from hackers, attackers, malicious IP addresses and bad bots.
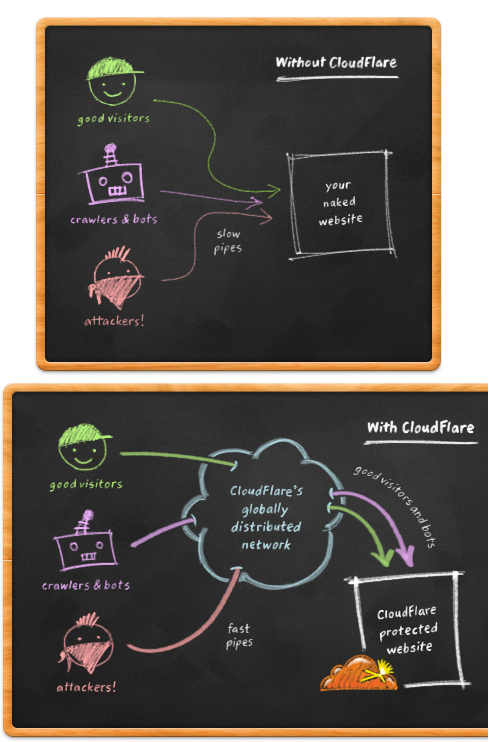
It acts a reverse proxy for your installation and all connecting IP addresses (your site visitors) comes from CloudFlare’s IP range. Keep in mind, the plugin doesn’t hide or mask originating IP addresses and makes sure that you continue to see all of them in your dashboard.
If you have any other tip to share OR have some query, feel free to use the comment area below!